![]()
Inventory Management System in Excel

An Inventory Management System in Excel is an advanced automated solution created using Microsoft Excel that helps track and manage stock, purchases, and sales efficiently.
This system uses Macros (VBA automation) to automatically record purchase and sales entries, update stock levels, and display real-time data on a dashboard with graphs.
🔹 Simple Definition
An Inventory Management System is a structured Excel setup that shows:
- Product stock availability
- Purchase and sales records
- Automatic stock updates
- Visual dashboard with charts and graphs
- Fully automated system using macros
🔹 Sheets Included in the System
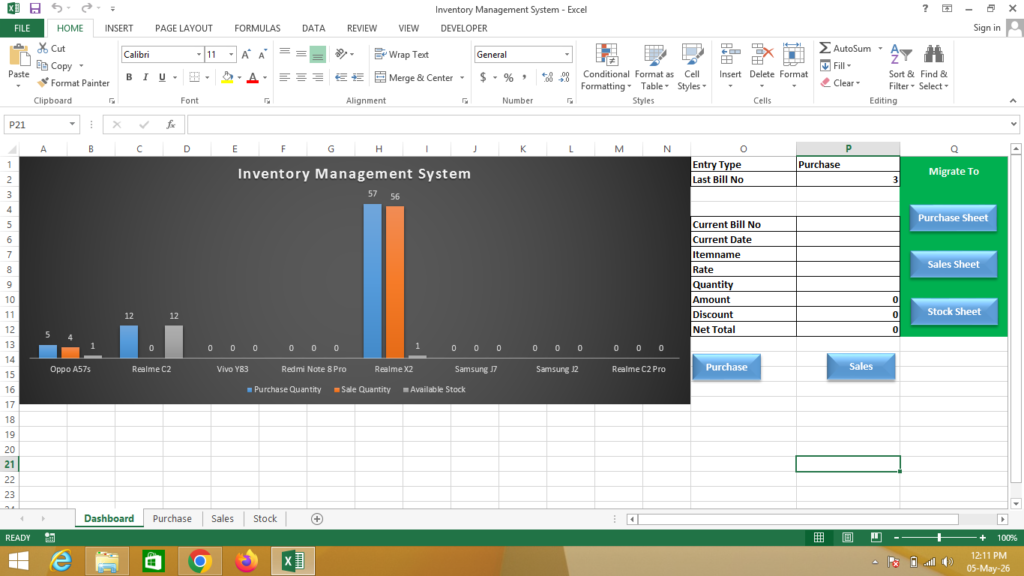
1. Dashboard Sheet
- Displays charts and graphs
- Shows stock summary, sales, and purchase insights
- Helps in quick decision-making
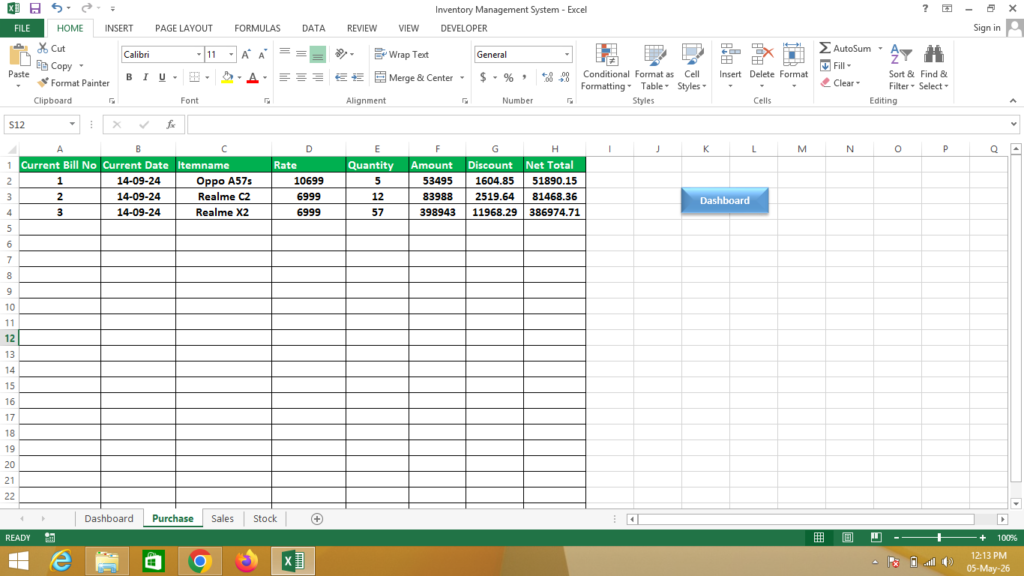
2. Purchase Sheet
- Records all purchase entries
- Uses macros for automatic data entry
- Updates stock automatically
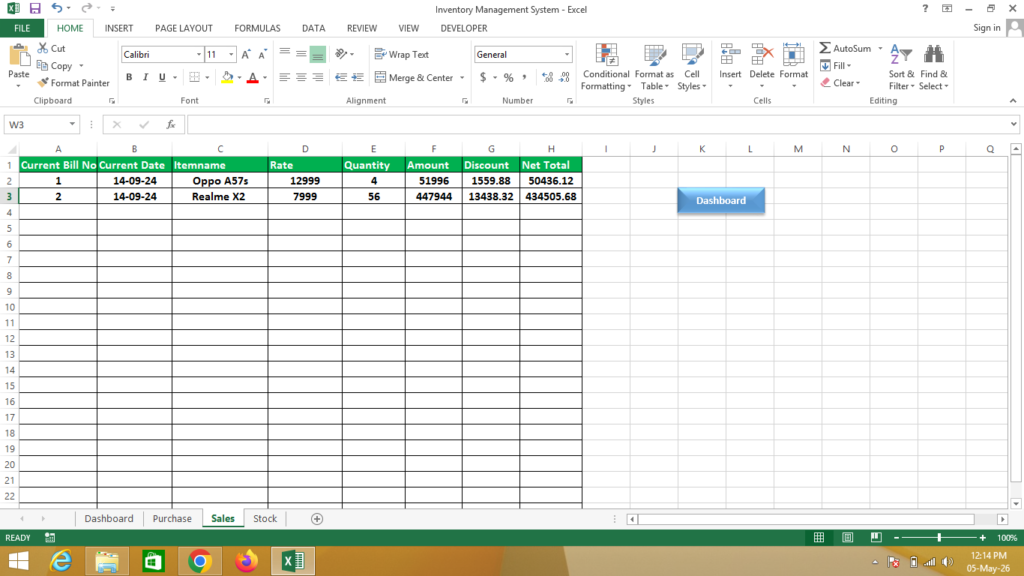
3. Sales Sheet
- Records product sales
- Automatically reduces stock using macros
- Maintains complete sales history
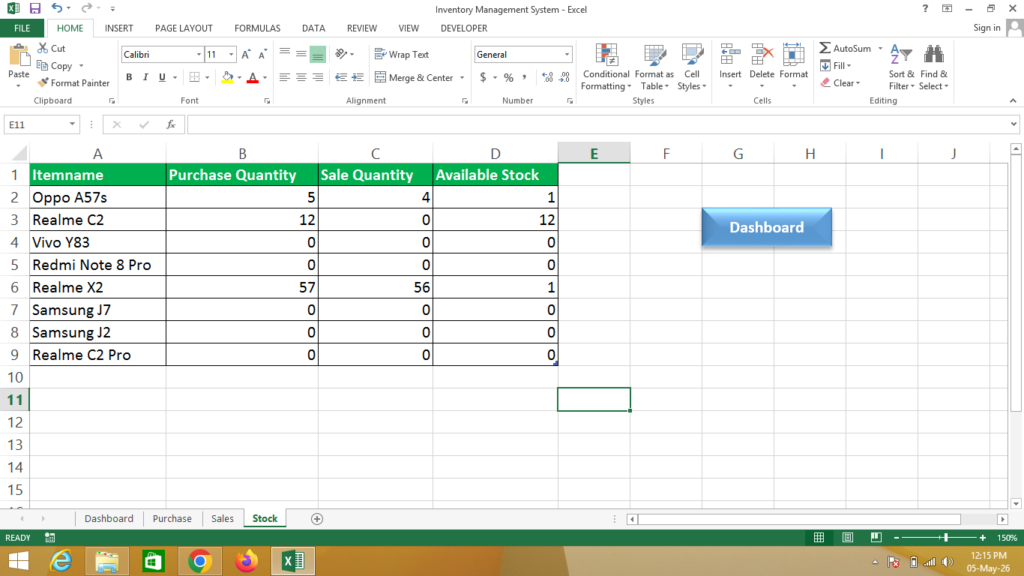
📦 4. Stock Sheet
- Shows current available stock
- Auto-updated based on purchase and sales
- Helps avoid stock shortages or overstock
🔹 Key Features
- ✔ Fully automated using VBA Macros
- ✔ Real-time stock updates
- ✔ Dashboard with graphs and analytics
- ✔ Reduces manual work and errors
- ✔ Professional business solution
🔹 Why use Excel for Inventory Management?
- ✔ Cost-effective solution (no expensive software needed)
- ✔ Easy to customize
- ✔ Powerful automation with macros
- ✔ Suitable for small to medium businesses
- ✔ Easy data management and reporting
🔹 Real-life Uses
- Retail shops and stores
- Warehouses and stock management
- Small businesses and startups
- E-commerce inventory tracking
Formula
Dashboard Formula
Last Bill =if(Click on Entry Type Purchase = “Purchase”,Max(Go to Purchase Sheet & Select Bill No Whole Column),Max(Go to Sales Sheet & Select Bill No Whole Column)) + Enter
Bill No = if(Click on Date Cell = “”, “”, Click on Last Bill No Cell + 1) + Enter
Amount = Rate * Quantity + Enter
Stock Formula
Select Range & Press Ctrl+T
Purchase Quantity = Sumif(Go to Purchase Sheet & Select Item Name Whole Column, Go to Stock Sheet & Select Item Name, Go to Purchase Sheet & Select Quantity Whole Column)
Sales Quantity = Sumif(Go to Sales Sheet & Select Item Name Whole Column, Go to Stock Sheet & Select Item Name, Go to Sales Sheet & Select Quantity Whole Column)
Available Stock = Click on Purchase Quantity – Sales Quantity + Enter
For Record Macro “Purchase”
- First Turn on Developer Tab
- Now in Dashboard Select Purchase in Entry Type
- Complete Purchase Entry
- After That Click on Developer Tab & Click on Record Macro & Name = Purchase
- Now in Dashboard Select Bill No to Amount & Copy that range of Data
- Now Go to Purchase Sheet & Click in L1 Cell
- Press Ctrl + Down Arrow, Ctrl + Left Arrow, Ctrl + Up Arrow
- Now Click on Use Relative References
- Now Press Only Down Arrow
- Press Ctrl+Alt+V & Now Click on Values Option and Click on Transpose Option & Click on OK
- Set Data Formatting According to You
- Press Right Arrow to Go to H2 Cell
- Now Go to Developer Tab & Turn Off Use Relative References Option
- Now Go to Dashboard Sheet & Select Data from Date to Rate & Press Delete Button
- Now Click in Date Cell & Stop Recording (Macro Recording has been Stopped)
- Now Select Purchase Shape & Right Click on That Shape (Purchase Shape)
- Now Click on Assign Macro & Click on Purchase Macro & Click on Ok
Sales Macro Same As Above
If You Need a Help – Watch Video